Automation Tab
This Help chapter is not yet complete and will be updated periodically.
Paid users can email alomware.com@gmail.com for help and support.
The Automation tab (Figure 1) is used to created actions that do things on your PC automatically for you. Some examples are typing text, moving windows, resizing windows, downloading files from the internet, modifying the clipboard text (such as changing it to title case), modifying other text in similar ways, showing alerts, and tweaking your PC (such as hiding and showing your desktop icons). Actions are created with short scripts of text that are easy to understand, and have full help descriptions in AlomWare Toolbox for them.
![]() You can right-click the tab itself to set it as your favorite tab (always shown when Toolbox's window opens), or to access related Settings for it.
You can right-click the tab itself to set it as your favorite tab (always shown when Toolbox's window opens), or to access related Settings for it.
![]() Disclaimer: AlomWare Toolbox's automation functions are intended for local PC activity that simulates a person doing physical actions, such as keyboard typing and mouse actions; and to work with files and folders and manipulate windows. It is not a comprehensive automation system that can be used to delve into online databases and extract specific data for download or modification, and neither can it be used control hardware devices or access other systems remotely (unless keystrokes can simulate it). For these situations you will need to seek an alternative product.
Disclaimer: AlomWare Toolbox's automation functions are intended for local PC activity that simulates a person doing physical actions, such as keyboard typing and mouse actions; and to work with files and folders and manipulate windows. It is not a comprehensive automation system that can be used to delve into online databases and extract specific data for download or modification, and neither can it be used control hardware devices or access other systems remotely (unless keystrokes can simulate it). For these situations you will need to seek an alternative product.
| Figure 1 |
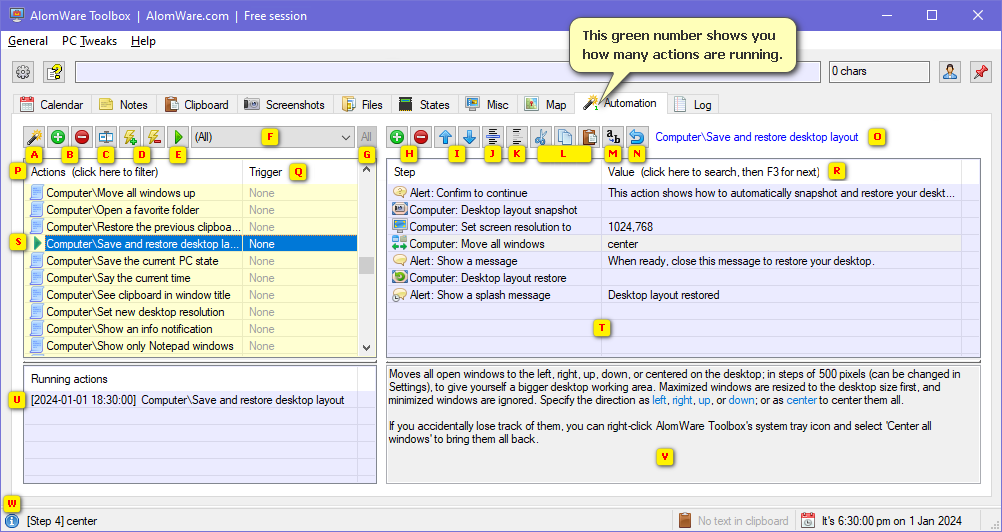 |
 The Action Wizard button. Click this to easily and quickly create a preset action from prompts, with no manual action editing needed. You can also re-add the default actions back into the app using this button. Note: If you want an action to be created inside a specific group (item F), then you need to be in that group before clicking this button.
 Creates a new blank action, or permanently deletes the selected actions in the Action list (item S). Note: If you want an action to be created inside a specific group (item F), then you need to be in that group before clicking this button.
 Renames the selected action in the Action list (item S). You can also press the [F2] key when an action is selected.
 Adds a trigger to the selected action (item S), or deletes an existing trigger from it. Triggers can be hotkeys, clipboard text that contains something, or typed text.
 Runs the selected action (item S) and shows a green "play" icon to reflect this and also lists it in the "Running actions" list (item U). You can also press the [F5] key to run it. Note that each action can only be run once, and not again until they end.
 The Action group selector. Actions can be sorted into groups, with (All) showing actions from all groups. There is also a built-in group called (Misc) which shows actions that aren't grouped. To create, rename, or delete a custom group: right-click this item and select your choice from the pop-up menu. To move selected actions into another group, right-click any of the selected actions and select "Move to" from the pop-up menu.
 Switches to the built-in (All) group to show all actions from all groups. If you're not seeing actions that you're expecting, make sure that the Action filter (item P) is not set and therefore hiding them.
 Adds a new step to the selected action by opening the "Step Chooser" window (Figure 2), or deletes the selected steps (item T) from the selected action. If you delete needed steps accidentally, immediately press [Ctrl]+[Z] to undo the deletion.
 Moves the single selected step up or down in the action, as steps are run in top-down order. If you need to move a bunch of steps: select them and press [Ctrl]+[X] to cut them, and then click the area in the list to locate them and press [Ctrl]+[V] to paste them there.
 Goes to and selects the step number that you specify. Used when an action gives an error about a step and tells you the step number to fix. If there is only one step in an action, it gets auto-selected and if applicable, a prompt for its value will also auto-open for it.
 Disables or enables the selected steps. Handy for when testing an action and you don't need all its steps to run. Disabled steps have a leading sem-colon in front of them (;) and will be gray in color. Tip: You can run just the selected parts of an action by right-clicking the relevant steps and choosing "Run selected step(s)" from the pop-up menu.
 Cuts, copies, and pastes the selected steps in an action. The cut or copied steps can be pasted into other steps, or pasted into any app that takes text, such as Notepad or sharing the action in an email. Tip: Holding down the [Shift] key when clicking the "Cut" or "Copy" buttons will format the steps in "code" style for sharing the action/steps on Reddit.
 Searches and replaces text in the action's selected steps. To search/replace in all steps, you can either select them all with [Ctrl]+[A] first, or deselect them all so that no specific steps are selected.
 Undoes the last change in the action, such as when you edited a step, added one, or deleted some. There is an undo buffer of 999 undoes, but please note that switching to another action will clear the buffer.
 The action group and action name for the selected step. This is just for quick reference in case the selected action is not visible in the Action list (item S).
 Click the list header to filter actions by their name or their steps and values. Hold down the [Ctrl] key when clicking the header to remove the filter and show all actions.
 Sets the trigger that runs the selected action. Triggers can be hotkeys, clipboard text that contains something, or typed text. You can also run an action by double-clicking it in the list, or selecting it and pressing the [Enter] key.
 Click the header to search all steps for the text you specify. Press the [F3] key after each match to find the next match (if any).
 The Action list. Double-click an action to run it, or select it and press [Enter] to run. A green "play" triangle appears next to an action that is running, and the Automation tab (at the top of the window) shows a green number to indicate the number of actions currently running. Also for your reference, a list of running actions appears below this list (item U). To permanently delete any actions, click them (with the [Ctrl] key held down for multiple selections) and press the [Delete] key. You can right-click the list to perform functions on some or all of your actions, such as locking them to prevent accidental deletion/editing, or to set their trigger, or move them into other action groups.
The way you name an action has an effect on how it's run. These are as follows:
- If the name ends with a dash (-) then it is disabled and can't be run.
- If the name ends with a plus (+) then it is added to the default Dock and system tray menu of the app.
- If the name contains a caret (^) somewhere in it (but not the last position) then it is auto-run when the app starts. Tip: If you hold down the [Ctrl] key when AlomWare Toolbox is starting, then actions set to auto-run will be prevented from doing so.
 The Step list, which shows the steps that the selected action will do. To add a step, click the green plus button (item H) above this list; or if you've copied action steps from elsewhere (that have the "(Start)" and "(End)" markers), then just click this list and press [Ctrl]+[V] to paste those steps into this list. Double-click a step to edit its value if it uses one (see "Creating a new action" below). Clicking the buttons above this list (items H to N) affects any step selections. Right-click any steps in this list for a small pop-up menu of options for the selections, namely: cutting or copying the selected steps to the clipboard, running only the selected steps, and modifying a macro's playback speed.
 The "Running actions" list, which shows which actions are running and the date/time they were run. You can select any of these and press the [Delete] key to stop them, but this isn't really recommended as they won't be able to clean up properly. You can think of this list as being like the Windows "Task Manager", with stopping them as being like killing a task/process. Tip: You can click and drag the slider line above this list to resize it.
 The help box for the selected step (item T). If you hold down the [Ctrl] key when clicking on a line that starts with "See also", then the Step Chooser window (Figure 2) will open to that step. Tip: You can click and drag the slider line above this box to resize it.
 The status bar will show the selected step's value (item T) for your convenience here, as some values may be too long to see in the Step list.
Creating a new action
The concept for actions is as follows: think of them as a list of things to do (called steps) in top-down order. Steps can have one or two parts: one-parters just do one thing, and two-parters also do one thing but using specific data you provide with it, called the value. An example one-part step is Clipboard: Clear all content, which clears everything from the clipboard. An example two-part step is Clipboard: Assign text (part one) with a value of hello (part two), which puts the text hello in the clipboard when the step is run.
Some actions require an Assign step first, before subsequent steps can do their task. For example, if you wanted to make the current window always stay on top of all others, you'd need to use the Window: Assign active step first in the action, and then follow that up with other "Windows" steps to act on that window (see Example 1 below). The same concept applies for other actions such as working with files: you assign a file to work with first (with the File: Assign step) before adding other "File" steps after it in the action (see Example 2 below).
Some steps can use built-in variables for the value, which means you specify a specific reserved word for the value which gets replaced when the step is run. Variables always end with a dollar sign ($) for easy identification, and as their name implies, their value varies and may not always be the same. An example variable is time$, which holds the current time of your PC. This means a two-part step made up of Clipboard: Assign text with a value of time$ will put the current actual time in the clipboard when the step is run, as opposed to literally putting the text "time$" in the clipboard.
![]() Click the green arrow at left to expand/collapse a list of available variables and learn which values they hold.
Click the green arrow at left to expand/collapse a list of available variables and learn which values they hold.
To create a new action without using the Action Wizard (item A in Figure 1), you have two options:
- The first option is if you've copied an action's steps from outside AlomWare Toolbox, such as from a website or friend. Such steps will be wrapped with "(Start)" and "(End)" markers around them. To create an action with such copied steps, first click the Action list to select it (item S in Figure 1) and press [Ctrl]+[V] to paste them. You will be prompted for a name for the action, so enter one and click [OK]. The Step list (item T in Figure 1) will now be populated with the steps, and the action is ready to run!
- The second option is to create a manual action by clicking the green plus "New action" button (item B in Figure 1). You will be prompted for a name for the action, so enter one and click [OK]. Next, click the green plus "Add step" button (item I in Figure 1). This causes the "Step Chooser" window to appear (Figure 2). Double-click a step in the list (item C) to add it to the action's Step list (item T in Figure 1). Note that it will inserted at the current selected step in the Step list. Some steps will open a prompt for more information regarding that step (such as a window title for a window step), so answer the prompt and click the [OK] button to save it. When you've finished adding steps, close the Step Chooser window by clicking the Close button ("X") at the top-right of it. If you add a step accidentally, immediately press [Ctrl]+[Z] to undo the addition (which also works with the Step Chooser window open).
| Figure 2 |
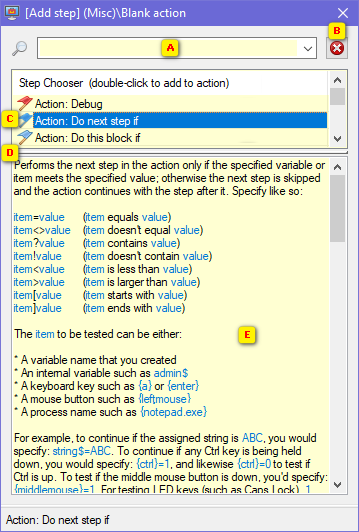 |
The search box for filtering all steps that contain the entered text. This is updated in real-time as you type. You can also click the down-arrow to select a group of steps. This button clears the search box to show all steps again (or you can just clear item A manually). The step list itself. Double-click the selected step to add it to the action's Step list (item T in Figure 1). The sizing grip. Click and drag this to see more steps or to see more of a step's description. The selected step's description and how to use it. Always read it carefully to fully understand it.Example actions
Example 1: Manipulating windows
Most actions have an "assigned" step, which are supported by other steps. For example, there's a step called Window: Assign active, which tells the action that all other "Window" steps in that action will be applied to the current active window. So you might follow up that step with another two-parter step called Window: Always on top with a value of 1 (meaning "yes"), and then assign a hotkey trigger to that action. As you might guess, pressing that hotkey will make the active window stay on top of all others. By contrast, a value of 0 (meaning "no") would stop the active window from being on top. The Window: Always on top step also supports a value called toggle, which swaps the current on-top state (Figure 5).
| Figure 5 |

|
Example 2: Setting the desktop wallpaper using a file
In this example, we're using the File: Assign from folder randomly step, where you specify a folder for its value. When this step is run, a random file from that folder is then assigned for use by all other "File" steps, and the filename is stored in the file$ variable for reference. For example, you could specify a folder full of JPEG images so that one is assigned at random, and then use the Computer: Wallpaper is step with a value of file$ to change the desktop wallpaper to that JPEG image (Figure 6).
| Figure 6 |

|
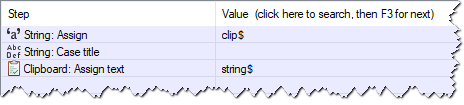
Example 3: Manipulating the clipboard text
As mentioned above in Example 1, "assigned" steps are supported by various other steps. Another such "assign" step is String: Assign, where you specify some text to use for the value. (In computer terms, "string" just means a line or block of text because it's like a string of characters). The "String" steps let you manipulate whatever text is in the string$ variable. So, to manipulate the clipboard text such as to convert it to title case, it's a three-step action as follows: first assign the clipboard text to a string (using the clip$ variable), do the conversion to the string, and then put the converted string back into the clipboard. Figure 7 demonstrates this.
| Figure 7 |
|
Deciding if an action should run
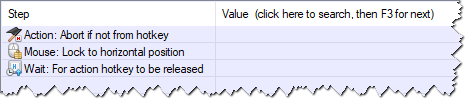
Steps of an action are normally run in top-down order, one after the other. However, sometimes an action should not be permitted to run unless certain conditions are met, such as actions that require running from a hotkey. As such, any of the following steps can go at the start of action so it can gracefully abort if the conditions aren't met:
- Action: Abort if not administrator - This step stops the action running if AlomWare Toolbox was not run with administrator rights.
- Action: Abort if no clipboard text - For actions that modify the clipboard text, this step stops the action running if no text is in the clipboard.
- Action: Abort if not from hotkey - This step stops the action running if it wasn't run from a hotkey (as opposed to a clip match or typing trigger).
- Action: Allow failure messages - This step specifies whether any failure messages for the action are shown or hidden, starting from this step onwards. For example, if you set it to 0 to hide failures, you will no longer see error messages like "This action has been aborted and won't continue" or "No window exists with the value" and so on. Instead, the action will just blindly continue with the next step, so make sure the rest of the action takes any failures into account!
Figure 8 shows an example action that locks your mouse position horizontally while you're holding down a hotkey, such as when drawing straight horizontal lines in a paint program.
| Figure 8 |
|
Changing an action's running order
As mentioned above, steps of an action are normally run in top-down order in the action, and when no more steps exist after the last one is run, the action ends. However, there are ways to move the order of steps in an action, such as to repeat parts of it or go directly to other steps. These are as follows:
- Action: Comment - This step puts a comment in that position in the step list. Comments can be any text you like, and they can also be used to indicate where the action should run its next step.
- Action: Go to comment - This step makes the action continue running from the step immediately after the specified commented step.
- Action: Go to start - This step makes the action continue running from its first step again, but without losing any data that the action has set so far, such as its variables.
- Action: Run again fresh - This step makes the action run from scratch again, and loses any data that the action has set so far, such as its variables. It's like the action was run for the first time.
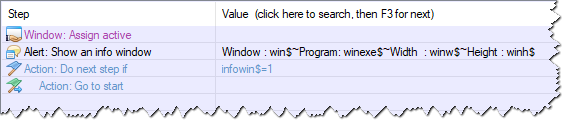
Figure 9 shows an example action that shows information about the active window. It repeatedly restarts the action (the Action: Go to start step) while the info window is open (the infowin$ value is 1). Note that step 4 is indented to show that it's affected by the step directly above it.
| Figure 9 |
|
Conditionally running steps in an action
Sometimes an action will need to skip certain steps or only continue if a condition is met. The conditional steps are as follows:
- Action: Continue if - Continues the action only if the specified item or variable meets the specified value.
- Action: Do next step if - Performs the next step in the action only if the specified variable or item meets the specified value; otherwise the next step is skipped and the action continues with the step after it.
- Action: Do this block if - Performs the next block of steps in the action (up to a later Action: End of block step) only if the specified variable or item meets the specified value; otherwise the block is skipped and the action continues with the steps after it.
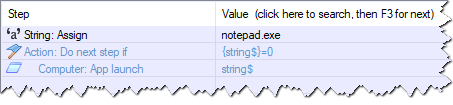
Figure 10 shows an example action that runs Notepad but only if no other Notepads are currently open. The variable string$ is set to the app name of notepad.exe in step 1, and step 2 checks if {string$} (in braces due to using an exe name) is equal to 0 (which means "notepad.exe" isn't running). If it's 0, the action then continues on step 3, which runs Notepad. Note that step 3 is indented to show that it's affected by the step directly above it.
| Figure 10 |
|
Repeating steps in an action
Sometimes an action might need to repeat steps indefinitely or for a set number of loops. The repeating steps are as follows:
- Action: Repeat next step - Performs the next step in the action the specified number of times.
- Action: Repeat this block - Performs the next block of steps in the action (up to a later Action: End of block step) the specified number of times.
- Action: Routine - Marks the start of a block of steps that can be run from another step, up to a later Action: End of routine step.
- Action: End of routine - Marks the end of a block of steps in a routine that were started with the Action: Routine step.
- Action: Do routine - Jumps to another part of the action (identified with the Action: Routine step) and runs the steps there up to a later Action: End of routine step. The action then returns back to this step after the routine ends.
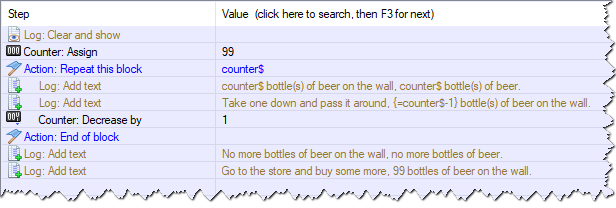
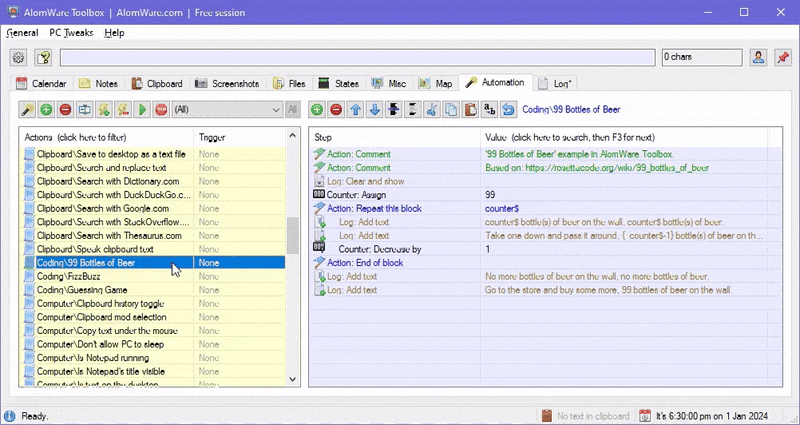
Figure 11 shows an example action that repeats a block 99 times to display the famous "99 Bottles of Beer" song in AlomWare Toolbox's Log tab (Figure 12). In this action, counter$ is a variable can be assigned any starting number that you like (99 in this case), which can then be increased or decreased with the Counter: Increase by or Counter: Decrease by steps. The {=counter$-1} text in the action is a real-time calculation which subtracts 1 from the current counter$ value, because any text inside {= and } is deemed to be a calculation. The Log: Add text steps shows a block of text in the Log tab, which in this case is the song text.
| Figure 11 |
|
| Figure 12 |
 |
Debugging an action
If an action isn't working as expected, you can put Action: Debug as its first step (or in any other step position) to make the action pause after each step is run. This opens a debug window (Figure 4) that allows you to examine the action's current variable values so you can confirm if they are what you expect. In Figure 3, the example action shown has five steps that auto-pause after each step is run, and you advance to the next step manually by either pressing the [Enter], [Space] or [Right] keys, or clicking the "Advance" button (item T in Figure 4).
- Step 1 opens the debugger window and pauses the action. Pressing [Enter] continues it.
- Step 2 assigns the string$ variable the text "notepad.exe", and pauses the action.
- Step 3 launches Notepad (by using the string$ variable), and pauses the action.
- Step 4 waits for Notepad to appear and then activates it, and pauses the action.
- Step 5 types "Hello!" to the activated Notepad window, and stops the action.
| Figure 3 |
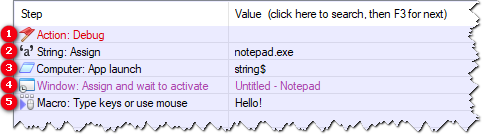 |
Figure 4 shows the debugger window and how to use it.
| Figure 4 |
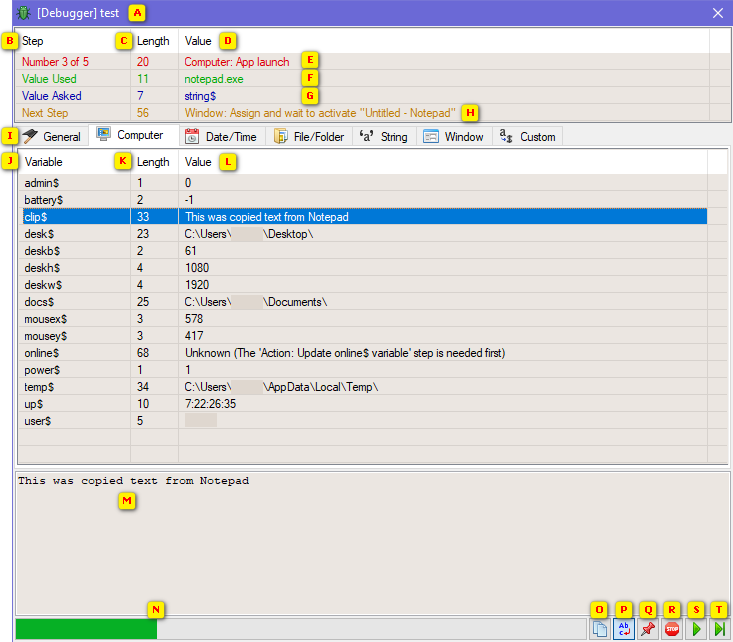 |
This shows the action being debugged (an action named "test" in this example). This column shows the step number where the action has paused. It also shows the actual value used for the step; the value that the step asked to use; and the next step to be run. This column shows the length of each text in the "Value" column next to it (item D). This column shows the value of the current step and info about it, as per items E to H below. This shows the current step that was run before the debugger paused. This shows the value being used for the current step (if relevant). This shows the value that the step asked for (if relevant). This shows the next step that will run when the [Enter], [Space] or [Right] keys are pressed, or item T is clicked. This row of tab shows all variables used by the action at this time, so you can check if they're what's expected. This column shows the variable names for the current tab selection (item I). This column shows the length of each variable. This column shows the text of each variable. This box shows a bigger view of the text of the selected variable (such as clip$ in item J). This is a progress bar showing how far along the action is before finishing. This button copies the text in the box above it (item M). This button toggles word-wrapping in the box above it (item M). This button toggles the debugger window from staying on top of all others. This button stops the action. You can also press the [Esc] key instead. This button continues the action, without pausing, to the next Action: Debug step or until the action ends (whichever happens first). This button runs the next step in the action and pauses the action again. You can also press the [Enter], [Space] or [Right] keys instead.More of this Help chapter will come in the future.