- Welcome to AlomWare Toolbox Forum.
Recent posts
#1
Tips and Tricks / Re: [Tip] Search for text in t...
Last post by Paul (Lead Developer) - Today at 02:46:15 PMOblivion, I just sent you an email with a private version about your issue above. Please test it with your actions that use cut/copy/paste, and also disable any steps in those actions that use "Wait: For action hotkey to be released". I'm 99% sure this will fix the need for you to add delays of 20 ms for your cut/copy/pastes.
For example, you could change this:
To this:
And please report back. Thanks!
For example, you could change this:
Code Select
(Start)
0001 Macro: Type keys or use mouse "{z20}{ctrldown}c{ctrlup}{z20}"
(End)
To this:
Code Select
(Start)
0001 Keyboard: Cut ""
(End)
And please report back. Thanks!
#2
Tips and Tricks / Re: [Tip] Search for text in t...
Last post by oblivion - Today at 02:27:22 AMMakes complete sense.
My best guess is that the need for it is variable depending on the speed of the machine -- or maybe just whatever's going on at the time. I get the same thing sometimes with the Keyboard: copy and Keyboard: paste commands, which I often (not always!) have to use a variant of
to replace. Sadly, it makes the code harder to read
(for the puzzled, that's a 20 millisecond wait, holding the ctrl key down, pressing 'c' for "copy", releasing the ctrl key again and waiting another 20 milliseconds, the paste equivalent would replace the 'c' with a 'v' and cut would use an 'x'.)
On one hand, it's definitely a bit more reliable on my admittedly slightly overpowered laptop and allows the tweaking of the delay (z50 or z100 for a 20th or a 10th of a second respectively) if it's still unreliable but it's harder to read and harder to maintain, sadly.
I've a few times thought about asking for a config tweak that would allow the delay before copy / cut / paste commands to be managed across the whole of Toolbox Automation but that'd be a bit of a blunt instrument, I think, so I've resisted.
My best guess is that the need for it is variable depending on the speed of the machine -- or maybe just whatever's going on at the time. I get the same thing sometimes with the Keyboard: copy and Keyboard: paste commands, which I often (not always!) have to use a variant of
Code Select
(Start)
0001 Macro: Type keys or use mouse "{z20}{ctrldown}c{ctrlup}{z20}"
(End)
to replace. Sadly, it makes the code harder to read
(for the puzzled, that's a 20 millisecond wait, holding the ctrl key down, pressing 'c' for "copy", releasing the ctrl key again and waiting another 20 milliseconds, the paste equivalent would replace the 'c' with a 'v' and cut would use an 'x'.)
On one hand, it's definitely a bit more reliable on my admittedly slightly overpowered laptop and allows the tweaking of the delay (z50 or z100 for a 20th or a 10th of a second respectively) if it's still unreliable but it's harder to read and harder to maintain, sadly.
I've a few times thought about asking for a config tweak that would allow the delay before copy / cut / paste commands to be managed across the whole of Toolbox Automation but that'd be a bit of a blunt instrument, I think, so I've resisted.
#3
Tips and Tricks / Re: [Tip] Search for text in t...
Last post by Paul (Lead Developer) - October 24, 2026, 09:04:50 PMThanks for sharing how to make it work for you, Oblivion. It's not needed here for my PCs, but I'm glad you sorted it for yourself.
I did toy with the idea of making an action not run until its hotkey is released, but that would break some actions from running immediately and/or correctly, such as this magnifying glass one: https://www.alomware.com/forum/index.php?topic=191.0
I did toy with the idea of making an action not run until its hotkey is released, but that would break some actions from running immediately and/or correctly, such as this magnifying glass one: https://www.alomware.com/forum/index.php?topic=191.0
#4
Tips and Tricks / Re: [Tip] Using the desktop ma...
Last post by Paul (Lead Developer) - October 24, 2026, 06:13:52 PMThanks for the positive feedback.
I added it after seeing this Reddit post:
https://www.reddit.com/r/software/comments/1x3ts9z/i_made_a_free_screen_magnifier_you_open_by/
So you can really thank the OP there for it being added to Toolbox
I added it after seeing this Reddit post:
https://www.reddit.com/r/software/comments/1x3ts9z/i_made_a_free_screen_magnifier_you_open_by/
So you can really thank the OP there for it being added to Toolbox
#5
Feature Requests / Re: Unavailable hotkeys
Last post by Paul (Lead Developer) - October 24, 2026, 06:08:38 PMIf you're a paid user, email me and I'll send you a download link so you don't have to wait. 
#6
Tips and Tricks / Re: [Tip] Using the desktop ma...
Last post by Phteven - October 24, 2026, 04:15:22 PMAbsolute magic! I've wanted something like this for years. Everything I tried was so convoluted or took up half the screen. Being able to just hold down a hotkey and drag the lens around is sweet AF!
#7
Feature Requests / Re: Unavailable hotkeys
Last post by Phteven - October 24, 2026, 04:12:31 PMI really like the look of this. Is there a way to get this version now?
#8
Feature Requests / Re: Unavailable hotkeys
Last post by Paul (Lead Developer) - October 21, 2026, 11:02:21 PMYou can already filter the action list by using the "Toolbox: Filter action list with" step in an action, but I do see merit in clicking the "Trigger" column and having a pop-up menu of types to choose. Would save creating an action to filter them, or typing the filter text manually. So, it's been done for the next release. Teaser:
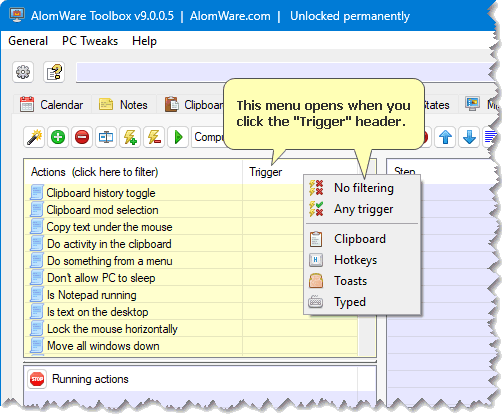
Teaser: #9
Feature Requests / Re: Window-specific menus
Last post by Paul (Lead Developer) - October 21, 2026, 05:46:09 PMLooking into it. Pretty sure I can do what rjbull is asking.
Pretty sure I can do what rjbull is asking. #10
Feature Requests / Re: Window-specific menus
Last post by oblivion - October 21, 2026, 05:32:27 PMSo do you mean a kind of way of enabling a bunch of text expansions or hotkeys that are only applicable when a specific application has focus?
I think, if you wanted (say) alt+F6 to behave differently depending on which application had focus, you could certainly write that into the action code, using something like
Not that it's quite the same thing, but I have a fairly complex text expansion that (without going into details) runs a process that gets the next number from the end of a bunch of saved files, increments that number and then types the filename with the incremented number suffixed to it. In principle, it'd be possible to ensure that it only did anything at all if the application that's saving the file was running; and equally, it could be coded to work differently if a different application had focus.
But I suspect if you wanted to have a set of application-specific text expansions enabled or disabled depending on whether a specific application had focus, that might be a challenge. Maybe Paul might think about making it possible for an entire action group to be associated with one or more applications and unavailable otherwise, but that feels like it might be asking quite a lot, particularly as you'd probably want the option to reuse hotkeys between different applications.
I think, if you wanted (say) alt+F6 to behave differently depending on which application had focus, you could certainly write that into the action code, using something like
Code Select
Action: Continue if "{notepad.exe}=1"Not that it's quite the same thing, but I have a fairly complex text expansion that (without going into details) runs a process that gets the next number from the end of a bunch of saved files, increments that number and then types the filename with the incremented number suffixed to it. In principle, it'd be possible to ensure that it only did anything at all if the application that's saving the file was running; and equally, it could be coded to work differently if a different application had focus.
But I suspect if you wanted to have a set of application-specific text expansions enabled or disabled depending on whether a specific application had focus, that might be a challenge. Maybe Paul might think about making it possible for an entire action group to be associated with one or more applications and unavailable otherwise, but that feels like it might be asking quite a lot, particularly as you'd probably want the option to reuse hotkeys between different applications.